Now that the season is over, you may have a lot of good pictures, not so good ones, and horrible ones. I would not recommend to throw away any of them before you see how useful they really are.
The picture I am using here is available by right-clicking the first one and downloading it: it is the starting point, so you can follow the steps and see if you get the process.
I use Adobe Photoshop Lightroom (version 4). If you use other software, the basics will still be the same, and of course, feel free to ask if you need help with other software.
The steps I usually follow are quite simple, I just want to enhance the pictures (and not photoshop them, as explained in a previous post)
First, the beginning picture, straight from my camera:
Before editing anything, we can start thinking of what can be improved in this picture:
- The horizon is not straight
- The foreground could be brighter
- The northern light could be a bit more dramatic
- The picture, in general, is a bit too dark
So, let's take it step by step:
First, we import the picture in Lightroom. There are several menus
there, we will take them one at a time
First, the settings used in the picture. Here we see that it was taken with ISO 800, 20 seconds, and 50mm focal length. Actually, this last value is wrong, since I am using a fully manual lens, the program sets the focal length to a default value of 50mm. In reality, the focal length was 14mm.

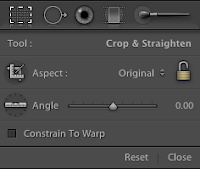
If we click on the first square, we will be able to straighten the angle of the picture (no cropping is needed in this case). In this case, approx. +4.5º of angle would make it straight.
The next part is the "basic" tab: here we will do the major part of our enhancement.
First, the color temperature (or white balance). In this case, we see that there is no need of modification. In the JPEG file you have the color temperature values are in 0. This is due to the compression: there is less information in a JPEG file than in a RAW file. Feel free to move the sliders to find the proper temperature for you.
The next part is the Exposure and Contrast. We want to have a brighter foreground, so we will increase the exposure up to +1.00, and leave the contrast as it is, since there is enough already.
Then, the tone adjustments: in my opinion, this picture does not need too many adjustments. I would maybe brighten the Shadows by 10-15 points, not more.
Finally, the Clarity, Vibrance and Saturation: Increasing clarity will give more dramatism to the picture. Put it to +40 and see the difference.
Vibrance and Saturation are tools that need to be taken carefully: increasing any of them will give deeper and more vivid colors. In this case, +10 of Vibrance gives just enough color to the picture, not making it artificial-looking.
Since this is a basic enhancing tutorial, I will skip other more advanced steps and go to the final details. In the "Detail" tab, we can sharpen the picture, and reduce the noise. Noise is what in film photography was called "grain". A bit of grain may be nice and give some character to the picture, but getting rid of it can be nice to a certain extent. This tool, as any other tool in photo-editing software, has to be used carefully. Too much luminance reduction would create a painting feeling, with extremely soft edges. Try moving the slider and see what I mean.
In my opinion, a luminance reduction of 35 should be enough. There is no need of changing any other parameter, unless you want to get into detail on the enhancement process.

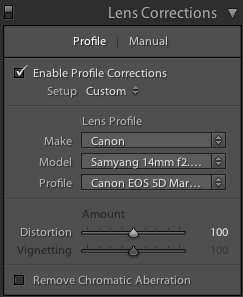
And finally, the lens corrections. Here we can use the default settings for each lens (Lightroom has a comprehensive library of the most usual lenses), where the distortion will be removed according to the parameters that are embedded in your picture.
Once you have found the settings you like for your picture, the last step is to export it. For that, the only thing that has to be done is to right click the picture, select "Export"and establish the parameters you want to put: output folder, file size, resolution and watermarks.
And that's it! Your northern light picture is now enhanced to look better.
Of course, there are a million other possibilities when it comes to photo editing. I try to keep the picture as real as possible, even if that means not having a green snake on the sky.
The next picture is the output of this tutorial:
But, as I said, you can make it look radioactive green:
What do you think about it? Do you need help with a picture?
You can contact me via the Facebook page, leaving a comment here or writing me an e-mail


No comments:
Post a Comment